Tuesday, September 27, 2011

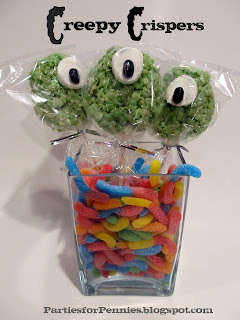
Creepy Crispers (Halloween Treat)

Whether you're having a neighborhood Halloween party, you're a room mother or you just love rice crispy treats (which basically covers everyone else...cus, come on...who doesn't love rice crispy treats??), this next party-penching party treat is perfect.

Here's what you need: 


Follow the usual Rice Krispy recipe -

3 Tablespoons butter or margarine
1 pkg marshmallows (10oz jumbo or 4 cups miniature marshmallows) 
6 cups rice crispies 

* Melt butter on low heat & then add the marshmallows
* Stir until marshmallows are melted 
* Add the rice krispies & stir until combined. Take off heat.
* Add a couple drops of your preferred food coloring to the mixture until combined.


 Roll out the Krispies 


 I used a glass to cut round shapes from the rice krispies. 


Tip: I sprayed  non-stick spray on the glass to make sure it didn't stick. I also sprayed it on the rolling pin.


Make sure you roll out the rks (rice krispies) as soon they come off the heat to make sure they're still pliable. 


 After the shapes are cut, put bamboo skewers (I used the small ones) into the RKs. 

( I layed them out on a cookie sheet sprayed with non-stick spray)


 Cut the marshmallows into quarters. 


 Put the black licorice jelly belly onto the marshmallow (I had no problem getting it to stick b/c the marshmallow was so sticky).

"I got my eye on you." (couldn't resist)


 Add the "eyes" to the green monster krispies.

(I'd stick these in the fridge for a bit to make sure they harden a bit)


I decided to use black twizzlers as a filler. 


I thought they looked cute until my husband Mike started giving them "voices"...now I'm a little creeped out. (hence the title...creepy crispers) BUT, they taste delicious. ;p 


I tried a different filler to see how it looked. I think I like the black licorice but there are definitely some options if you wanted to display them. 

Let's talk about the cha-ching-chang of these treats - 

Rice Krispie Cereal $2 (on sale & Publix brand)
Marshmallows $1
Black Jelly Bellys $0.19 (I only got what I needed)
Butter, Food Coloring, bamboo sticks, plastic treat bags - $0 (already had)
Black Twizzlers - $2

(If you decide to use the gummy worms, they're about the same price as the twizzlers b/c I got two bags)

Grand Total: $5.19 

(This ended up making 12 crispers but I could've stretched it to 14 if I hadn't had "samples" ;p) 

Total per treat: $0.43 or $0.37 (if I hadn't been generous with my own samples)

More Halloween fun to come... :-) 


Wednesday, September 21, 2011

Slimey Halloween Favor

I have a weird love of Halloween. I think it's because growing up, my parents didn't celebrate it. We would have family night, watch a movie, order pizza & hand out candy to trick or treaters. Honestly, as a kid, I don't remember minding as much...except when kids would come to school the following day with BAGS of candy. For a sweet-tooth girl like me...THAT was torture. But my dentist was thankful. :-)

Maybe that's why, as an adult, I love when Halloween comes around. I think it's the creative costumes, the breadsticks that become bloody fingers, the cheesecloth spider webs and ofcourse more candy than Willy Wonka's Chocolate factory. :-) 

If you're having a Halloween party, especially for kids, this is a great penny-penching party favor that's fun to make! 

Here's what you need - 


Black Spray Paint: already owned
Old Cream Cheese container/
Yogurt container (minus the yogurt & cream cheese): already owned
Any type of decoration you'd like - I picked glow in the dark (I don't care how old I am, I'm a sucker for Glow stuff) stickers: $1.99 

Total:  $1.99

This is what you'll need to make the slime - 


Borax - I picked up at my local Publix for a few bucks
Food Coloring - already had
Glue - Already had 

Total: $3.00
 ( I honestly can't remember how much the Borax was but I only used a tiny bit & you can put it in your laundry too) 


Step 1: Spray paint the container. It only took a couple of coats but I'd advise to do a very light coat first. You can see on the top that it started to puddle a little. 

Step 2: Decorate the container

Pretty easy, huh? The slime making process is pretty easy too. I'm very sorry b/c I didn't take any pictures of that process. Boo on me. 

HOW TO MAKE SLIME 

(I got these instructions from Science Bob

In addition to the Borax, glue & food coloring, you'll also need - 2 disposable cups, a spoon to stir, a tablespoon & water. 

1) Fill one cup with water
2) Add a spoonfull of Borax
3) Fill the other cup with an inch of glue 
4) Add 3 tablespoons of water to the glue & stir.
5) Add whatever color food coloring you desire into the glue mixture & stir
6) Add 1 tablespoon of the Borax/water mixture from the other cup to the glue mixture & stir

The slime will start to form. Wait for about 30 seconds. You're slime will be ready to play with. 


This is not only a great party favor, but your kids can help you make it & it becomes a great science lesson. 

I tried to teach Guinness (my stepdog) about polymers...


I can't fault him too much. Science class did this to me too. 

Until...he thought it may make a nice late night snack...


Please don't call Animal Services or my husband...I didn't let him eat this. 


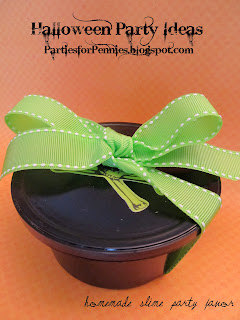
Here's the final favor wrapped in a bow, with a skeleton peeking out from that pretty bow. ;p 

Not bad...a party favor that only cost $5...so depending on how many party attendees you have...it could end up to be between $0.50 - $0.25/favor. Start stockpiling yogurt/cream cheese containers now. This favor is dentist approved, too! :-) 


Did I mention that the skeleton glows in the dark?? Did I mention that I just can't say no to glow in the dark things? Did I mention I may have some left over glow sticks in my house? Just cus you never know when you'll need a glow stick. 

Thank you for reading my blog, even though I can be a little strange. :p 

More Halloween ideas to come over the next few weeks! Stay tuned. 


Photobucket

Thursday, September 15, 2011

Chalkboard Charger

Hey guys! First of all, thank you so much for stopping by. I really appreciate you reading, commenting...or even just a swift glance. :-) Could you do me a favor? I need some constructive criticism and/or what you want to see more of here on this blog. Could you email me if there is anything you'd like to see on here or if there's something really annoying about me? Scratch that...I don't want your typing fingers to get exhausted from the list of annoying things. Just let me know your feedback. Also...email me if you have "party block" (ya know, like writers block) maybe I could help think of some ideas for you. Here's where to find me: heidi@heidirew.com

Okay...now on to a couple ideas I have for you this week. First of all, this is whatcha need -


The slate tile is from Home Depot. It was about $1/tile. When you go to look for the slate tile, make sure you try & find one with the smoothest surface possible. Some of the tiles were a little ridgey (hmm...the computer proofreader says that's not a word...oh well). The felt guides were a couple bucks & I got them at Publix but you can find them anywhere. I already had the chalk but you can get that at most stores for about $0.99. 


Clean the surface of the tile with soap & water. Then attach the felt guides to the bottom. 


You can use this for a kids party & it doubles as a "charger" as well as a game board. Allow the kids to draw on it with the chalk or play tic tac toe, hangmen, etc. 


For a little over $1 each...you have a party activity, name setting & a charger. BUT...there's also another use for this little project...


A cheese plate! :-) You know what my biggest complaint with cheese plates is? WHEN people don't label the cheese. I grew up in the South where there was only one kind of cheese...and it came packaged in the Kraft mac n cheese box...and on special occasions, we'd break out the frozen lasagna from Costco. We had a big family & didn't have much money...I only recently found out that Brie wasn't just a pretty girls name. So...now...you can easily label the cheeses for those still trying to break into the refined life. ;p 


Just lay your cheese spread out & use the chalk to label the different cheeses. Side note - I love cheese plates...they're so easy for parties but cheese can be quite pricey. So far, I've found Costco to have the cheapest cheese. 


Another side note: Those crackers are these new wheat thin "flatbread" crackers & they are quite delicious. Like...pry them out of my fingers I've already had half a box good. :-) So you can either take that as a warning or a recommendation. 


I just included the picture above b/c I was playing with the vase of flowers. I know...I just need to keep working on my photography skills. :p 

Stay tuned for next week b/c I'm going to begin my Halloween party ideas/projects. Can't wait to show you! I hope you have a great week!


Tuesday, September 6, 2011

Let's Give Em Something to Talk About...(Biggest Party of my Life, continued)


One of my biggest concerns when planning parties is for everyone to have fun. 


That's why I always suggest to have handfuls of napkins. They always get the party started. ;p 

Well...that's not exactly the direction I was going but there's definitely something fun & crazy about throwing napkins up in the air & shouting "Oopah"! This was taken the night before our reception. We went to a Mediterranean restaurant & had so much fun. Those are three of my best friends in the whole world right there.  Kauri (the redhead) did a guest blog for me here. Jenny (in the purple) did my invitations & programs & you can visit her site here. Rachael has a brand new baby girl that has stolen my heart & she's starting a job marketing healthy baby products. 

Okay...sorry...back on track. 

Weddings especially can be a little awkward if you don't know other people there. Weddings often involve sitting for awhile waiting on the bride & groom.  There's only so long that you can take Aunt Gertrude talking about all her recent ailments. 

That's why I decided to help the guests out a little.


See the little yellow tag tied around the flowers? 


You can see it better here. This was after the rain drenching. :-( My friends helped me finish all of these & hand-stamped each one. Stinkin rain. ;p 

I found those over-sized tags at PaperSource on clearance for a little over a $1. I got three packs (10 in each) of yellow, green & grey. 

Using the stamps I had used for the matchbox favors, I stamped "Something to Talk About" on the front &  on the back I attached printed conversation starter questions. 

Each table had a different question and I wrote on the back encouraging them to check out the questions on other tables. 


I wanted to give you the conversation starter questions I used so you can use them too...at your next party (if you'd like) or even your next date. 

If you don't like these, Real Simple posts a question a day that would be good. I used a few of their questions & just came up with the rest. 

CONVERSATION STARTERS 

1) Do you have a dish that's your specialty?
2) If you could go back in time, when & where would you live?
3) If you could play hooky for a day, what would you do? 
4) If you had an "I'd rather be ______" sticker on your car, what would it say?
5) What magazine fits you most (your personality/life)?
6) What did you want to do when you were little?
7) What is the worst financial advice you've ever received?
8) What's the biggest etiquette dilemma you've faced?
9) What reality TV show would you consider auditioning for? 
10) What is the first concert you ever went to?
11) Name three songs that were on your mix tape.
12) What is the weirdest thing you've seen at a wedding? 
13) What movie line do you quote the most?
14) What decade do you think most defines your personal style?
15) What was your favorite toy as a kid? 

The worst party is where people feel uncomfortable. That's why I always try & give everyone a variety of activities & ways to get involved with one another. 


And of course...there's always gotta be dancing! It is difficult to get people out on the dance floor but here are my two must-haves to get people to dance -

1) My DAD - I know...you probably went "huh?" 
My dad is an elementary school PE teacher (the best) & creates all kinds of original line dances for his classes. At weddings, he whips those line dances out & he's like the pied-piper. So...if you'd like to rent him for your next event, just email me. Seriously though...if you have at least one or two people you talk to ahead of time start the dancing...everyone will follow. Especially if it's line dances. They're fun & easy to learn, you don't have to have a partner & by the time you get down every step...the song is done...which makes you want more. 

2) A GREAT DJ! - And that is hard to come by. If you have time, I'd highly suggest stopping in to hear the prospective DJ on another gig before deciding. ORR...you could contact our DJ who was & is awesome...but I will warn you...he has no Lady Gaga. My friend Jenny was quite disappointed when she found out. ;p He really is incredible. His name is Tony May & you can contact him here

Well...that does it for the wedding reception posts. Ya know how I said I don't need drugs, I plan parties? It is seriously the truth. I'm itching to plan another one.