Wednesday, December 7, 2011

Hot Chocolate Bar Part Two (The How To)

Hey guys! Hope you're having a great December so far!

Mike (my man) & I went to a Tacky Christmas Party this past weekend & it was so fun. Whoever was the first to come up with that party idea...I dub them genius. Part of me thinks it was the people at Goodwill...they were trying to come up with a way to move the huge inventory of puff-painted 80s Christmas sweatshirts. ;p


Mike felt compelled to pose like this periodically throughout the evening. ;p The funny story behind his Christmas vest was it ended up to be my friends MOMS! I posted a picture of it on facebook when I spotted it in Goodwill & my friend said, "Oh my goodness, that's my moms old vest. She dropped it off at Goodwill a few weeks ago." Yikes! It was okay, though. Her mom gave us her blessing & said, "wear it with pride." As you can see...Mike is doing just that. 

Now, let's talk more about this Hot Chocolate Bar from last week. I promised more detail & here it is...


First of all...let's talk about the decor. My only expense in the decor was...

* A roll of wrapping paper (few dollars) for the backdrop
* A huge book of scrapbook paper (50% off at Michaels so it was $10) 
* An old frame from Goodwill ($1.21) 

For the garland, I strung cotton balls with string & a needle. It was so easy & so cheap. 

The frame, I primed & painted a bright red. I ended up using the "Heidi Handwriting" font for the different hot chocolate combo suggestions because our printer was being a little ornery. 


The "platform" the frame is on is just an old box covered in the scrapbook paper. 

The other plates/dishes I already had. And the peppermint cookie bouquets were just glass vases that I covered in scrapbook paper, stuck some floral foam in & then covered the top with mini marshmallows.

Onto the tasty items...


Gingerbread Biscotti...yum! Are you a fan of biscotti? I am....as in I could be head of the fan club. There is nothing that makes a cup of coffee better than biscotti. 

Biscotti takes awhile to bake & you have to give it some attention...so as an attempt to make the process a tad quicker...I used Gingerbread Cake Mix. 


You will also need a stick of margarine, 2 eggs, 1 cup of flour & 1/2 cup of chopped nuts (I used walnuts). 

If you want the recipe...you can find it HERE. Just trade the "devils food cake" for the gingerbread cake mix. 


Once you bake your dough, you'll cut slices of biscotti & then toast them on either side (the recipe will tell you how to do this). 


Melt some white chocolate & dip the flat end to coat. 

Once they're dry...they're ready to dip. These would make great Christmas gifts...stick em in a mug & tie a ribbon around it...bam! :p 


Another thing I made were mini grilled cheese sandwiches with crescent rolls. These tasted great but there's two things I'd change...1) More cheese or add some other toppings 2) I'd cut them into triangles instead of rectangles. I just think they may look a little prettier in triangles. 


They're really simple. Start with a can of the Pillsbury crescent rolls. Unroll the dough, cut into 8 squares/triangles. Place your cheese on one square/rectangle. I used white american cheese but it'd be fun to do a combo of cheeses or...oh...BRIE. Yes...that's what I should've done. Darn it. ;p Oh well...they may have not made it to the "photo shoot" above if I made them with brie. ;p 

Back to the cheese...grilled cheese that is. Take the other square/triangle & place it on the one that has the cheese on it. Pinch the sides together. Bake according to the Pillsbury instructions & you're done. :-) 
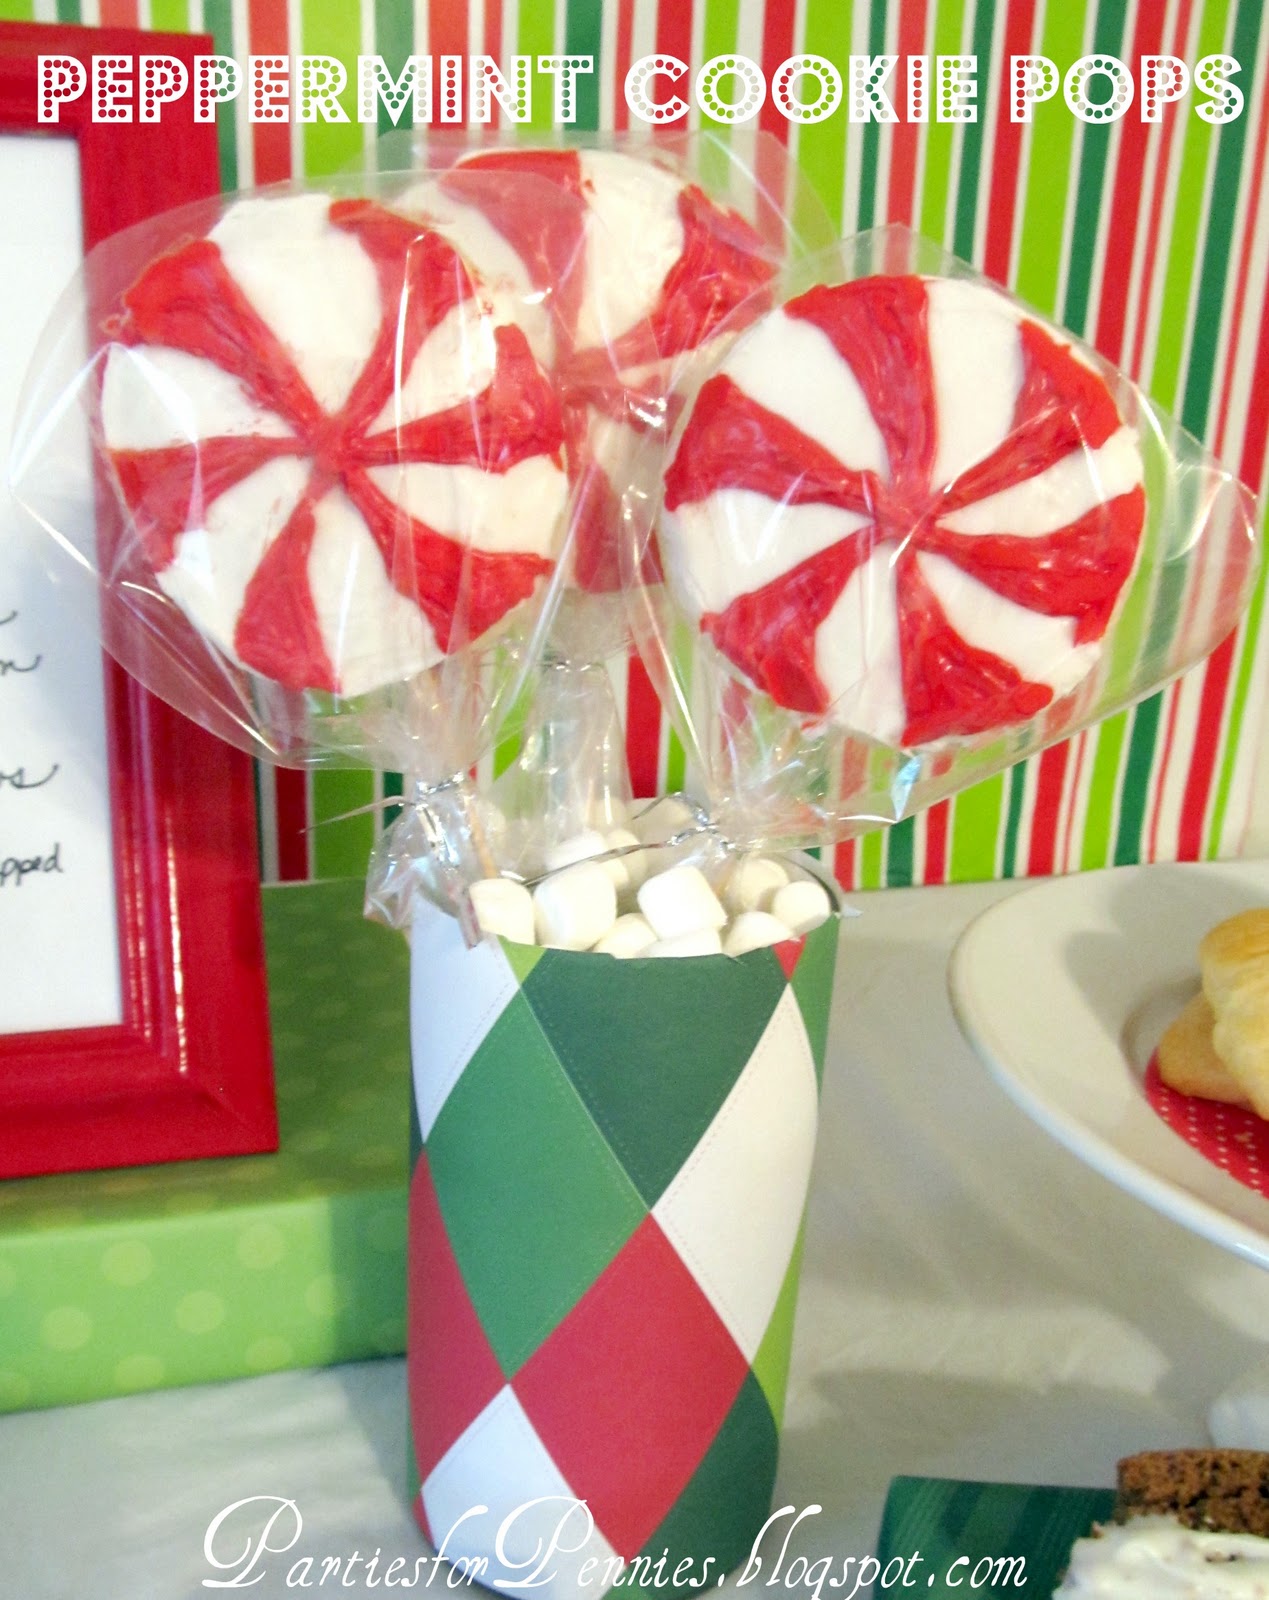

These peppermint "pops"...I'm not sure what to call them. Peppermint cookie pops? Peppermint Cookie on a stick? (If you're a Jeff Dunham fan, you'd appreciate that one) Peppermint Pinwheel? Anyways...they're basically sugar cookies decorated in colored icing to resemble a peppermint. Plain, simple & cheap...that's how I roll. 


I just used pre-made sugar cookie dough. Look...during the holidays...it's busy enough & if you're doing the food for a party & hosting...I'm all about some shortcuts. 

I inserted the lollipop stick in the cookie before I baked it. Then bake as directed. 


I am not a tool  I mean I don't have a lot of tools...tools for icing, that is. Thanks to Ziploc...that doesn't matter. 

Begin by icing the cookie with white icing. Using a Ziploc, or if you've got the "tools" use a decorating tip, cut a small (very small...at least start off this way, you can always cut more) hole at one tip of the bag. 


Continue around the cookie until you have a peppermint design. 

*There was ONE hitch I had. I used the pre-made jar of icing from the grocery store. The problem with that icing is that it doesn't really harden. I should've used the sugar cookie icing recipe my mom always would make. It hardens. This really only matters if you're putting the plastic over the cookies. 


Another easy treat that goes well with hot chocolate is popcorn. This was super easy. I just made the cones from some of the scrapbook paper, popped the corn & it was done. 


These are the toppings for the hot chocolate. For the rasberry syrup...I actually experimented using rasberry jelly & it worked pretty nicely. I added a few teaspoons of water to a pot & added a few teaspoons of rasberry jam. I brought it to a simmer & it made a pretty nice syrup. 

Here are the combinations I suggested with the toppings above - 


See those mug jackets? I made those from socks & gave them as favors. The mugs were from the dollar store...so everyone got to take home the mug & their mug jacket. 

Here's how to make those - 


My only regret is that, while the Christmas socks looked cute, they weren't really efficient. I'd buy either thicker socks next time or try it with a Goodwill sweater. 

A great, inexpensive Christmas gift would be a mug, with the mug jacket on it & some Gingerbread biscotti tucked in. Wrap it in some cellophane, tie some ribbon around it & you've got a nice homemade gift for around $5 or so. 

If you're still getting things together for a Christmas party or need some ideas, check out my "girls" Christmas party from last year. We had Southern food tapas, did a jewelry exchange (of jewelry we didn't want anymore) & spent just $50 on the whole thing! Read about it HERE & part 2 HERE.  

(Sorry for the pictures...I think I took them all with my phone at that time.) 

Next week...I'll give you guys some great stocking stuffers that are UNIQUE & under $5! I'll share the homemade gifts I'm giving my co-workers & some ideas for hostess gifts! 

Hope you're having a not-so-stressful-Christmas season so far! :-) 


holiday home button centsational girl

Photobucket


Tuesday, November 29, 2011

Hot Chocolate Bar

Hey there! I hope you had a great Thanksgiving! We had a great time with the family...eating, playing games, eating, talking, eating, laughing...we did a lot of laughing & that burns calories so I'm even. ;p Here's a picture to show how serious the men of the family take Movember -


I just realized that I gave the guys that had the least amount of hair on their head the longest beards. ;p Love you Dad & Uncle Ken. ;p 

Okay...back to parties people. What's one of the best things about cold Christmas nights? Snuggling up with a cup of hot chocolate! And if you're planning a Christmas party in the midst of the hustle & bustle you want something easy, fast & not too bad for your wallet. 

Enter the Hot Chocolate Bar...


Simple treats, great for adults & kids, self-serve drinks & easy. 

This was my menu - 

Gingerbread Biscotti (made from Gingerbread cake mix) 
Popcorn Cones
Mini Grilled Cheese Croissants
Sugar Cookie Peppermint pops


For the Hot Chocolate, I gave suggestions of drink combinations, giving each a name based on Santas reindeer:

Dasher:
Sea Salt + Caramel + Whipped Cream

Cupid:
Rasberry Syrup + White Chocolate Shavings + Whipped Cream

Blitzen: 
Crushed Graham Crackers + Chocolate Syrup + Marshmallows

Rudolph: 
Crushed Peppermint + Marshmallows + Whipped Cream 


It was really fun & easy to put together. For favors, I made No Sew Sock Mug Jackets & got some cheap white mugs so guests could bring those home too. 

But...I'll show you those next Wednesday morning. I know...cruel. I'll also tell you how I made the grilled cheese croissants, gingerbread biscotti, popcorn cones & peppermint cookie pops. 

One thing I will tell you is that snowball garland strung above the table??? 

That's made from cotton balls. I took a needle & ran string through cotton balls. 

Let me know if there's any questions you have so I can answer them next week. 

P.S. Sorry about the pictures. It was the gloomiest day ever & I couldn't get the lighting right. I was hoping I could edit it to look okay but I still don't like it. :-( 


Wednesday, November 23, 2011

The Liebster Award


A few weeks ago, Heather Champion at chevymommasramblings.blogspot.com bestowed upon little ole Parties for Pennies the Liebster Award. I hadn't heard too much about it but it's basically a great way to honor other up & coming blogs or blogs you just love & want to share with others. 

The Liebster Blog Award is given to blogs with under 200 followers. Liebster is a German word meaning dear, sweet, kind, nice, good, beloved, lovely, kindly, pleasant, valued, cute, endearing and welcome. 

My job is to pass this award onto 5 other deserving blogs. There are so many blogs that are worthy of this, it was so hard to choose. I tried to pick blogs that had something to do with parties or party-planning. (Sticking with the theme of this one, ofcourse)

The rules for the Liebster Award are -

1) Thank the giver & link back to the blogger that gave you the award. 
2) Reveal your top 5 picks & let them know by leaving them a comment on their blog. 
3) Copy & paste the award on your blog.
4) Have faith that your followers will spread the love too. 

I'd like to pass on the Liebster Award to: 

* VivianElle Invitations (I'm a little biased b/c this is one of my best friend's blog & she did my reception invites & programs here...she's pretty awesome) 
* Passion~For~Parties.com - this blog is eye candy for party planners! Great ideas! 
* Bird on a Cake - check out Robins Andes Cake! Yum! 
* Aimee Bee - she has awesome crafts! You will not be disappointed!
* Sunny Vanilla - Adorable blog & flowing with creativity! 

These blogs will inspire you & give you amazing ideas! 

Happy Thanksgiving Everyone! :-) 
The rules for the Liebster Award are:
1. Thank the giver and link back to the blogger who gave it to you.
2. Reveal your top five picks and let them know by leaving a comment on their blog.
3. Copy and paste the award on your blog.
4. Have faith that your followers will spread the love too!

Tuesday, November 22, 2011

Cake Pops...How to Do Em Up Right...

So...just wondering...have you heard of these things called Cake Pops? Hmm? No? Yeah...they're kinda up & coming.

I love being sarcastic. My husband can totally beat me in the game of sarcasm, though. Yeah, we're a strange couple who will try & one up each other in sarcasm. We go until someone says something completely indistinguishable & stupid. I'll give you one guess who that person is... ;p

Okay, back to Cake Pops. I've attempted Cake Pops two times. First time, they were alright but I hate reading directions so I kinda just guessed my way through making them. Second time, I went a way cheaper & quicker route. I'm talking about it took me like 15 minutes from start to finish. And I'll show you what I did in a later post. But this week, I asked a friend Tabitha to tell us the proper way to make cake pops.


Isn't her family adorable? Picture perfect. 

Tabitha & her sister have a cake pop business here in Atlanta that make some impressive displays. 


I haven't met Tiffani yet but Tabitha is just so tiny & cute & so sweet. 

Before Tabitha tells you how to do some cake pops up right, how bout we see some of their handywork? 


Gorgeous, huh? 


Here's Tabitha & Tiffani's how to for cake pops. 


What you will need:

Cake Mix (any flavor)
Two containers of icing (preferably not creamy)
Ice cream scoop
 Chocolate mold sticks
Chocolate wafers*
 Aluminum foil
Cookie pan
Big block of Styrofoam (to put pops in while decorating)


Begin with baking a cake with the flavor of your choice. 
Let the cake cool after baking
Crumple the cake into small pieces
Mix in complete container of icing (half if creamy) into the cake crumbles. 
Place a piece of aluminum foil of the cookie sheet 
Create small balls with the mixture by rolling in palm of your hand (recommend using ice cream scoop to get a constant size)
Poke the stick halfway in the cake ball and pull back out
Melt small amount of chocolate in a glass bowl( or coffee mug) for about two seconds or until melted
Dip the end of the stick in the melted chocolate and place back into the cake pop
Place the pops on the cookie sheet and place them in the freezer for 30 minutes

Decorating
Melt chocolate in a coffee cup about 3/4 full
Take out cake pops one at a time and dip in the chocolate
(Do not spin cake pop in the cup this will loosen the stick and the pop will come off)
Tap the stick on the side of the cup to make the excess chocolate come off 
If you are adding sprinkles to your pops cake sure to do them immediately after dipping so they will stick
Stick each pop in the Styrofoam straight up to dry
After the pops dry, decorate with icing 


I had a few extra questions for Tabitha. They make it look so easy! But I needed some amatuer guidance -

1) What are chocolate wafers? Regular chocolate bark? 

It's the name of the chocolate melt at Hobby Lobby (It's the only kind we use). This is a link to where you can find the chocolate wafers online. 

2) Tabitha, you mentioned freezing the pops. The last batch of cake pops I did, I froze them then when I dipped them in chocolate, it began to crack. What did I do wrong? 

Never  freeze the pops for more them the 30 minutes.  It makes the chocolate crack, and changes the color.

(Ahh...my multitasking while they were in the freezer was definitely longer than 30 min.) 

3) How do you make such beautiful displays for the cake pops? 

First, put something heavy in the vase or whatever you're using for the arrangement. The cake pops are heavy, so you want to make sure it doesn't fall over. Then put the styrofoam in.

 Cover the styrofoam up with flowers, a  feather boa or anything pretty! Be creative. 

DO NOT put the arrangement in the sun or outside on a hot day. It's chocolate and will fall apart and melt.

Here are some more examples of the cake pops Tabitha & Tiffani have made...


Wouldn't this be perfect for a New Years Eve party? 


Baseball party...or as a gift. Bouquet of baseball cake pops. 


I'd go back to school just to get this! :-) 


This is really a work of art!


This works great as a centerpiece. 


Love those little chicks. This would be great for Easter or a baby shower. 


Last one...


I just had to show some love for the feathers! :-) 

Thanks so much Tabitha & Tiffani for teaching us the ways of cake pops. :-) 

Heads up...I'm posting again tomorrow night & it's about an award I got & I'm passing it on to others & I'm gonna show you an awesome last minute Thanksgiving idea. 


Wednesday, November 16, 2011

Thanksgiving Table - White House Quality on a Dollar Menu Budget

One of my favorite parts of Thanksgiving growing up was the fact it was one of the few times we got to use Dad & Mom's china. It made everything seem so special.

Unfortunately, I don't have the money to go all out on fancy dishes for Thanksgiving...so with one little helper, I came up with a tablescape/setting for $0! 

That helper? A gold pen I got last year to address Christmas cards. 

Let's start with the table BEFORE - (I'm sorry...but I'm gonna make you scroll all the way down to see the AFTER) ;p


Just ordinary white plates (Crate & Barrel that I got at Goodwill). 

I wanted some swanky dessert plates but didn't have any. Enter a leftover stash of white plastic dessert plates. They needed some bling bling, though...


I wanted to write something on the plate but wasn't sure how "health friendly" that gold pen would be underneath all the food. I decided to write it on the backside so you'd still see the word but it wouldn't be touching the food. 

Problem was...I didn't know how to write backwards. I used wax paper as my stencil & traced over it. It turned out great & was really easy. 


After I traced "Thanks", I used the gold pen & glammed up the edges. I feel like this is something JLo would be proud of, for some reason. Gold = Glam = Jenny from the Block...I don't know. Anyways...


Next, I had several mini pumpkins I had used to decorate for Halloween. 


They got an Edward-like makeover (you know from Twilight...my lover Mike always tells me that if you have to explain jokes, don't say them. But that would mean I'd never ever tell a joke the rest of my life...so sorry for my lack of funny. ;p). I spray painted them white with some leftover spray paint. 


Using my handy dandy gold pen, I colored the stems gold then I wrote different things I was thankful for  on each pumpkin. 

Family, Gods Love, Health, Husband, Friends, Home...& one more thing I'll share at the end. 

See those leaves around the pumpkin? I gathered those from our backyard & outlined them in gold...


Can you tell how tight my gold pen & I are getting? :p Just wait...


For the napking rings, I used twine I had left from the wedding & wrapped it several times around the napkin then tied it in a bow. We have GOBS of acorns around our yard so I picked up a satchel full & painted the belly part with my buddy, the gold pen. The whole time, I'm wondering what my neighbors are thinking...1) She's such a lazy butt...she goes & picks up a few leaves then lets her husband rake the rest 2) What is she picking up? (Enter husband of neighbor) Probably their dogs poo. But with her bare hands? Disgusting. 3) She seems so interested in leaves in her yard, why doesn't she plant something...like grass so our neighborhood looks better! (There's an actual story behind this...maybe I'll share later...I can see you nodding off so I'll stop. ;p)

I wanted to add a lot of candles but dress em up a bit. So I decided to do poor man's gold crackling on some extra glass tealights I had. 


I've seen tealight holders like this at West Elm & Z Gallerie. It was so fun to recreate them & not spend a dime! My buddy goldie (the pen) is permanent so I can use these for years.  

Let's see the Before one more time...

Plain Jane

After...


Those white candleholders I got at Goodwill ages ago for $1 for both & have used them for all kinds of things. 

I also wanted to see what it would look like without the leaves. I added the leaves because I felt it needed some color but I think I'm really digging this classic look. 


What do you think?


Me & goldie glammed up some more acorns to add to the candlescape. 

If you're wondering about that pretty white cake stand...I got it from Wisteria back in the spring when it was on clearance. 

I love to look at our dining room table. It makes me smile & makes me think of all the things I'm truly grateful for. One of those things is...


I'm not just saying that. I really am. When I started this blog last New Years Eve, I knew I loved to plan parties on a budget but I never knew anyone would read this. ;p Your encouragement, comments, support (with the Better Homes & Garden contest) & just plain reading this thing...makes me smile bigger than a teenager getting to meet Justin Bieber. :-) Thank you!

I've got another post I'll post this week, then I have an awesome guest blogger for next week. So much fun stuff to come! Happy Thanksgiving! 


One Artsy Mama