Tuesday, May 29, 2012

Nautical Themed Favor

Are you a coffee drinker? We certainly are! As in...we have to buy our coffee filters & coffee from Costco because we go through it so fast (it's just me & my husband). ;p

The other morning, when I made my morning cup o' joe, I saw some potential in those plain jane coffee filters.


I thought, 'those would make some great nautical themed party favors'! 


First you need the cone coffee filters, some bamboo skewers or small dowels, a glue stick, white paint pen & scrapbook paper. 


Cut out a couple of circles for the front of the favor. 


Glue them to the front. 


Cut out a long triangle & glue to the top of the dowel/skewer. 


I just wrote out Thank You with my white paint pen but a nice printable would look much better! ;p 


Glue the top of the filter half way across. Add the pendant as well & secure. 


Fill the favors with whatever kind of goodies you'd like and seal the other side. M&Ms, jelly bellys & other candies would work perfect. 


Some other variations could be sewing the top of the filters closed, adding some ribbon to the top of the filter or some small rope. 

Here's the breakdown: 

Time: 10 minutes per favor (could be less by doing a lot at a time) 
Cost: $0.50 per favor 
Level of Difficulty: Easy 

Hope this helps your next nautical party sail! :-) 

What's your favorite beach? Is there a certain beach you go to each summer? 

p.s. You can now LIKE Parties for Pennies on facebook! Click here.


Monday, May 28, 2012

Weekend Wrap Party - Memorial Day wedding

Happy Memorial Day weekend! Hope you're having a great weekend! 

If you have served our country in any way or are a family member of someone who's served...Thank You! 
Those two words don't seem sufficient enough but know that you are in our thoughts, prayers & in our gratitude daily. 

If you're new to Parties for Pennies, I started doing the weekend wrap party so we could get to know each other better. I share what I did over the weekend & hopefully you'll share what you did. You can leave it in the comment section, facebook it (www.facebook.com/PartiesforPennies) or email me (heidi@heidirew.com). 

Our big event this past weekend was a wedding! My sweet friend Laura married a great guy named Eric. She & I have been radio friends for many years. Radio is a crazy, crazy business & she has been a blessing to me walking through this career since we both began. Here are some of the snapshots - 

You know I had to take some pictures of the centerpieces! 


The wedding was at a beautiful place called The Vinings Club. Here's the view of downtown Atlanta from where we were sitted. 

Parties for Pennies Wedding tip: I looked into the Vinings Club for our reception & booking it on a Friday or Sunday (like Laura did) saves a ton of pennies! :-) 


Eric & Laura & Me & Mike 


I had to get one just with the bride! She looked so beautiful! 


The cupcakes were done by Piece of Cake in Atlanta & were delicious! I had heard so many wonderful things about Piece of Cake but hadn't tried it yet. So glad I did! Yummy! 

My Memorial Day weekend didn't fit the usual bill of cookouts & pools but it has still been wonderful! What about you? Has it been the usual...pool & cookouts? 

Check back this Wednesday for a Nautical Themed Party favor using a household item! 

p.s. You can now LIKE Parties for Pennies on facebook! Click here.


Tuesday, May 22, 2012

Mad Men Party - part 2

Thank You so much for stopping by! You're probably expecting to see a Mad Men - themed party I did! 
You can find it, by clicking here. It will take you to my blog that is now on Wordpress. 

Sorry about that but you'll find a lot more cool ideas on the new & improved Parties for Pennies page!

Sunday, May 20, 2012

Weekend Wrap Party - party area organization

Hey friend!

Do you have something in your life that when you complete it, you feel a huge sense of accomplishment? It could be crossing something off your to do list, seeing your child showing love to someone that other people leave out, it could be resisting that urge to eat the whole 1/2 gallon of ice cream :p...What is it for you? 

Besides party planning, my sense of accomplishment comes from organization! You know how I knew my husband was the man for me? He bought a label maker for Christmas. Oh yeah, I get flustered just thinking about it. ;p (The fact my husband got me a label maker, not flustered over the label maker. Geesh, I'm not that OCD ;p) 

This weekend it was time to tackle my craft/party area. We just finished our basement & there is still a lot to do but Mike was so awesome & put together these cabinets so I could organize all my craftiness. 

Here's the before.... (scary) 


And the after...


I apologize for the lighting. When I finished the sun was beginning to set & there's only one tiny window down there.


I tried to use things I already had. I just hot glued some ribbon onto this empty frame & put a dry erase sheet in it. 


All of my markers & scrapbook paper is color-coded now & I'm in heaven. ;p 


I cut some strips from the dry erase sheets I had to make labels that could be easily changed. The dry erase sheets I got from Pick your Plum. You should check it out. You sign up for daily email deals & they send you great deals on all kinds of craft items. 

It is so nice having a place for everything! :-) 

While I was working with ribbon & scrapbook paper, Mike was busy working on his voiceover studio. That was the big reason we finished our basement, to create a voiceover studio. I do some voiceover work too, but not on the scale that my husband, Mike does. You can check out his skillz on his site


He was working on this little nook right here. That's where we'll set up the microphone & a stand. The rest of the room will be the sound equipment & I'm gonna try & help accessorize it. ;p 


If you turn that little corner, this is your view. It's amazing how you sound in the main part, compared to this little area. 


Another BIG part of my weekend was getting the Parties for Pennies logo designs back from the amazingly talented Kimberly Herbert (she also did our photography for our reception & the Mad Men party). My only problem is I can't choose which one I like best. I thought I'd enlist you to help me choose. Leave a comment & let me know which one you like the best. 

1

2

3

What do you think? You see how this is a hard decision?! :p 

Kim really did a great job! If you are wanting a logo designed, you can contact her via her photography site

Thanks in advance for your help on picking a logo design! Hope you had a great weekend! Let me know what you did this weekend, too! Share in the comments below. 

Stop back in this Wednesday for part 2 of the Mad Men Party! 
            
p.s. You can now LIKE Parties for Pennies on facebook! Click here

Tuesday, May 15, 2012

Mad Men Themed Party - part 1

Thank You so much for stopping by! You're probably expecting to see a Mad Men - themed party I did! 
You can find it, by clicking here. It will take you to my blog that is now on Wordpress. 

Sorry about that but you'll find a lot more cool ideas on the new & improved Parties for Pennies page

Sunday, May 13, 2012

Weekend Wrap Party - Mothers Day

How was your Mothers Day weekend? I hope it was awesome! 

Here's the dealio on the weekend wrap party...I want to get to know you better so I'm hoping by sharing what I did over the weekend, you can share what you did too. So...I want to know about your Mothers Day weekend! Was it great? Not so great? A downer? Or whatever you want to share. :-) 

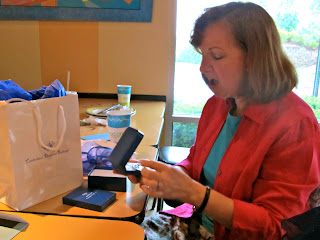
Sunday, the whole family met at Doc Greens (the lighting was terrible so I apologize for the bad pics) to lavish Mom with gifts & cards. Besides Mothers Day, we also celebrated her birthday which is this week. 


First up, we all pitched in & got mom a Cricut. She's a 1st grade teacher & has her eye on that for awhile. 


The second gift she received was from Mike & me. We got it at Cumberland Diamond Exchange. I had narrowed it down to three choices & my facebook friends helped me make the choice. I went with the Gabriel locket. I knew my mom could wear it with anything & we were able to engrave the back.  


I think she was happy. ;p 

My mom gets more beautiful every single year. It's simply amazing. She is one of the most kind, giving, joy-filled, loving, loyal, supportive & encouraging person. I really am blessed to have a mom that has set such an example for me in life, in love & in faith. 

If you're a mom...thank you for all you do. 
If you're yearning to be a mom...I'm so sorry. I know Mothers Day had to be hard to get through. 


How was your weekend? I'd love to hear. You can leave a comment, email me (heidi@heidirew.com) or facebook me (www.facebook.com/PartiesforPennies) 

Stop back in on Wednesday because I'm going to share the pictures from Mike's Mad Men themed birthday party! 

Have a great Monday! 
                                                              

Tuesday, May 8, 2012

Household Item Place Card Holder

Have you ever been setting up for a party, only to realize you forgot something? Something important?

What do you do? I'm not gonna lie...most times I kinda panic at first then stuff an extra cupcake in my mouth (because usually I don't eat much the day of a party & because carbs + sugar always help you feel better ;p).

Last weekend, I threw a birthday party for my husband. I can't show you the pictures yet (hopefully soon). But I forgot to make sure I had something to hold the food labels. Ugh...party foul. But you know me, I like to take party fouls & turn them into party fun.

So, I grabbed two things I had around the house -


A Bottle Cap & A Paper Clip

* I spray painted the bottle cap silver & let it dry
* Took my trusty glue gun & glued the paper clip to the bottle cap so it was upright. 

Voila - 


If this wasn't a last minute project I think I would've spray painted the little glue hump too. ;p 


So put away your wallet!
Don't spend money on those menu card holders...or even place card holders...just start saving your bottle caps. We usually buy Mexican coke bottles from Costco (it isn't made with the high fructose corn syrup) so we have quite a storehouse of bottle caps. ;p 

Have you ever forgotton something for a party you were throwing? 

Hope you have a great week & Mothers Day! If you're wanting a last minute Mothers Day gift, check out this project

Are you on facebook? Check out the Parties for Pennies page here
              

Monday, May 7, 2012

Weekend Wrap Party - The Graduate

Anyone else have a busy weekend? I'm actually thankful for Monday after a week & weekend like the last one. ;p Ever experience that?

If you're a new Parties for Pennies reader, I really want to get to know the people that read my blog. That's why I started the Weekend Wrap Party posts each Monday. I thought if I shared a little about my weekend, you could share too. Then we can get to know each other better. So please feel free to share through comments or email what your weekend was like! (My email is: heidi@heidirew.com)

Last week was super busy with work, I took Friday off but it was to get everything ready for Mike's (my main squeeze) birthday shindig on Saturday. I did a Mad Men themed party & ofcourse I'll share about it right here.

The party finally came together & I was exhausted but it was well worth it. Mike really enjoyed it...so I consider it a success.

Sunday, was another special celebration. My brother Ned graduated with a double major from Georgia State! He's a pretty smart guy. This is a guy that started listening to Clark Howard when he was in 6th grade. If you don't know Clark, he's a local Atlanta radio host that gives financial advice. As soon as Ned was 18, what did he do? He went straight to the bank & opened an IRA. Yep, it's kinda annoying when your younger college-age brother is giving you advice about what kind of mortgage to take out for your house. ;p I'm so proud of him.


The graduation was at the Georgia Dome. Due to some poor legistics, I've never felt claustrophobic until yesterday. Getting out of there was ca-ca-ca-rayzy! 

I went to a very small private college in Tennessee called Bryan College & our graduating class was a 
tad smaller than this. ;p Do you detect a hint of sarcasm? ;p Instead of each of them walking across the stage, they just had each department stand up. But...I was able to snap this picture of my brothers name in "lights." 


Let me explain his name. The first Edward Young Rew was my great grandfather. He was nicknamed, "Ned." My grandfather went by Ed & my dad by Eddie but my parents really liked the idea of calling my brother Ned. 


Here's the whole crew - (L-R) Mike, me, my sister Meg, her fiance David, Ned (the graduate), Mom, Dad, Anna Panlilio (a friend of the family) & my bro Clayton. 

I may sound like a mom when I say this but it's hard to believe my little brother has grown to be such a wonderful, intelligent man. It seemed like just yesterday he was climbing trees & just being a little boy. He is an amazing guy with a wonderful heart, a servant attitude, good worker, smart & sooo funny! 

Now...I need to go grab some tissues. ;p Hope you had a great weekend! Any graduations? 

Stop back in on Wednesday because I'm going to show you a way you can make place setting card holders/menu label holders with two items you have around your house! Keep checking for all the details & pictures from the Mad Men party! 
                                                     

Tuesday, May 1, 2012

Wedding Sign Tutorial

If you feel a little deja vu, you're right. I did a tutorial for a rustic wedding sign here. The ones I want to show you today are a little more traditional. I actually like them better. The rustic signs are a lot easier, since mistakes give it character! :p

Wedding signs are awesome. They can be informative as well as a perfect decorative element. Here's a really inexpensive way to make the signs & no power tools required! :-) 

I made these signs for my friend, Jessica, who got married last weekend. You can see the post about her bachelorette party here & her wedding weekend here. I used one of the signs from my reception (you can see that post here) & made an additional one. 

This was the sign from our reception. 

For the second sign, I got a board from Home Depot in the scrap pile & had Home Depot cut it down for me. My total came to $1.07. And no need to own a saw or risk cutting off my hands (I'm kinda clumsy like that. It's a miracle I can walk in heels & even that is up for debate).

The first step is sanding. You can use regular sand paper or...


Use this! 

This is my one & only power tool & it's my pride & joy. ;p I know...that's sad, huh? Mike got it for me last summer & I heart my sander. It is seriously the ONLY tool I used on this project & you don't even have to use it for your signs.

After you get it sanded, you can use primer if you want. I didn't but it definitely took more coats than usual. I simply used some purple acrylic paint from Michaels that I got for 40% off. Holla for Michaels coupons! :p


After the boards were painted, I wanted the word "wedding" to look really pretty & fluid. Since it wasn't a rustic sign, I didn't want to just free-hand it myself. In my mind, I imagined making my own stencil but it ended up a little differently. Here's what I tried & failed at - 

* Using my Cricut - I know usually that's a sure thing. The font cartridge I had just didn't produce the style I wanted. 
* I then tried the regular printer. I printed out a Times-like font, even painted it on the sign but didn't like how it turned out. So I had to repaint the whole sign. Ahhh. ;p 

FINALLY...I found a font called "Snell Roundhand." It was perfect. 
You can see from the picture above that I printed the word on cardstock, then cut it out. 


I used a pencil to trace "wedding" onto the sign. 


I started to just paint inside the stencil but that wasn't working too well. I realized I could use a white paint pen to be a better guide. I went over the pencil lines with the paint pen then filled it in with white paint. 


After the paint dried, I used a yard sale sign stick we had in the garage (you can get a bundle for a few $ at Home Depot). I didn't want to deal with nails & hammers & yada, yada so I opted for wood glue. 

Once you put the wood glue on the yard sale sticks, place one of the boards on top & weigh down with something heavy. When that dries, turn it over & place wood glue on the other side of the sticks, lay the board on top & again weigh it down. 


Once the wood glue is dry, you can show off your beautiful signs. Here's the finished project. 

I did finish it off with a clear gloss coat. 


These are great to pointing people in the right directions & giving instructions. Not to mention, they look cute! ;p

Even if you're not getting married, these signs make a great contribution to someone you know who is. If you want to help but can't afford to help monetarily or time-wise...these would be great gifts to a bride to be.

What has been the neatest thing you've seen at a wedding lately?

Hope you have a great week! I've got a REALLY special party I'm throwing this weekend & I can't wait to share with you all the juicy details! :-)