A friend of mine requested that I do a tutorial on how I made the signs for my wedding. Since I've heard of a lot of engagements over the holidays, I thought this would be a perfect time to show you how I did it.
Listen...I'm no Tim the Toolman Taylor, YoungHouseLove or Bower Power...so you may be let down with this tutorial because it is so easy. I didn't even use any power tools (well...actually I lied...my husband bought me a handheld sander in the midst of this project...so I did use that).

The first thing I did was go to Home Depot & purchase some cheap wood. I honestly can't even remember which kind it was...I just looked at the dollar, dollar bills, ya'll. ;p A very kind & patient Home Depot associate cut down the wood to pieces. I held out my hands & said, "I need it like this long or so & this wide." He stared at me blankly for awhile & then he realized I wasn't kidding. See...he was very patient & gracious. The actual dimensions are 7"x 27".
The two legs coming out from underneath are stakes I had leftover from a yard sale. You can get these stakes from Home Depot or Lowes toward the back of the lumber aisles. Super cheap.
Since we had our reception in our backyard, we didn't want to upset our neighbors so we had the guests park at a nearby church. The guests were shuttled by a huge limo (all thanks to Carriage Automotive Group, a dealership I endorse that rented this as a wedding gift) to our house. The purpose of this sign was to assure guests that they were at the correct church parking lot.

First, I started by painting a base color. Since my wedding colors were yellow & gray, I painted the base color a yellow (Martha Stewart Tahini to be exact). I didn't do a primer...not because I was being lazy but because of time. I was on a time schedule & decided that since it was rustic, I'd not worry about the primer.
Once the yellow dried, I painted the gray color (Martha Stewart Zinc...ps...I got a small quart size paint & I still have some left) very lightly.
Once the gray dried, I used my new handheld sander to file away. I began around the edges & then made my way across the rest of the sign. The yellow peeked through perfectly.
Because I wasn't going for perfection, I painted the word Wedding with just a smaller paint brush. I honestly don't like my handwriting, so I would suggest maybe going with a stencil or even printing out the word in your desired font & use that as a guide.
Once the wording dried, I took my sander & very lightly went over the wording.
Using wood glue...yep...no nails...I generously glued the stakes & the signs together so the "Wedding" sign was visible from both sides.
As far as stable, this sucker endured many mallet pounds & it's still standing strong. Not bad for wood glue.

In the same trip I tested the patience of the Home Depot associate cutting wood for the sign above, I also had him cut these little ditties. I think they're about 4X6. I painted the sides & backsides the same gray as above & the front with chalkboard paint. My handyman husband drilled a couple holes in these suckers & they were ready to hang.

This sign was made from an old piece of art I tried to sell at a yard sale with no luck. I sanded it, painted it with chalkboard paint, used a white paint pen to draw the "Now Showing" part & the "lights around the edges (once again...should've used a stencil...I was kinda rushing by this point) & wrote in chalkboard Mike Married Heidi. I figure I could use this again for a movie night party.
We actually got married in Hawaii by ourselves. Just us. My mom was okay with that, actually. We wanted for others to be able to experience our ceremony, though, so we put together a portion of the ceremony, the vows we wrote & pictures throughout our dating on a video. It ended up to be a very special time during our reception.

The art from the "Now Showing" sign were actually two panels that went together. The second panel got used for our menu sign. Again, I sanded & painted it with chalkboard paint & wrote the menu in chalk. Because I looked at several different stores, I wanted to let you know where I found the cheapest easel. It was at Hobby Lobby. I think it was about $10.
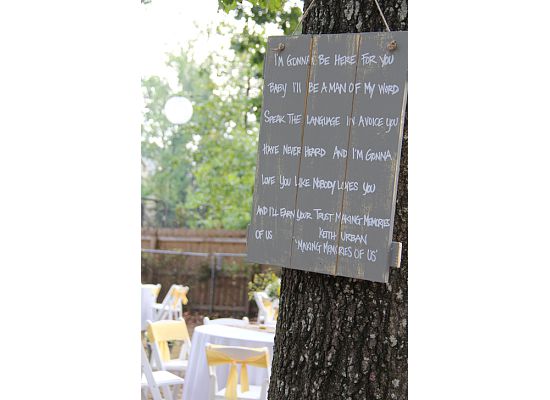
These were the other signs I made. I called these lyric boards. Mike (my hubby) & I love music. It means a whole lot to us & our life. I wrote out lyrics to several of our favorite songs & hung them on trees in the yard.
These were made similar to the Wedding sign above. I painted the base yellow, then the gray over it & sanded it down. I realized that painting the lyrics like I did the "wedding" wasn't going to work. Instead, I used a white paint pen. It worked out much better. For smaller font, use a paint pen. For larger font, a paint brush & stencil will work.
I believe that these boards a little smaller than the Wedding sign above but not by much. I took three boards & spaced them so there was just a tiny gap between each. I then used two much smaller pieces of wood to anchor the three. One smaller piece on the bottom & one piece on the top. I applied wood glue to the small pieces of wood & adhered them to the three larger pieces. Mike drilled two holes in the top, I added some twine & it was done. Ofcourse I sanded these too...to give them a rustic feel.
If you want to see more of what I did for my outdoor wedding reception, you can find PART ONE here & PART TWO here.
The total wedding cost came to right around $5,000 for around 140 people.
Hope you have a GREAT first week of 2012. Next week, I'm gonna ask for your help/input so please stop by next Wednesday. :-)

Such cute ideas! I love the lyric boards. I'm not even dating right now, let alone getting married but I am moving into my own codo soon and may use the lyric board idea. There have been a few songs that have changed my life and I would love to have them memorialized like that.
ReplyDeleteOh, and can I just brag on your husband for a minute. Granted, I've never met him in person, but I sent him an email about a fish bumper sticker and ended up sharing a shortened (although not really very short) version of my story. Not only did he read it, but he took the time to write back with some very encouraging words of wisdom. I'm so happy that you guys found each other. God bless you both!
Thank you! You'll have to post a pic of the lyric boards...if you end up doing them! I'd love to see them. Thanks for bragging on my husband. I have to say that I Thank the Lord every day for allowing me to be married to him. I'm one lucky lady. :-)
ReplyDeleteNice post. I like the way you start and then conclude your thoughts. Thanks for this information .I really appreciate your work, keep it up .Thanks a lot for sharing. political signs
ReplyDeleteThhanks for sharing
ReplyDelete