Mike (my man) & I went to a Tacky Christmas Party this past weekend & it was so fun. Whoever was the first to come up with that party idea...I dub them genius. Part of me thinks it was the people at Goodwill...they were trying to come up with a way to move the huge inventory of puff-painted 80s Christmas sweatshirts. ;p

Mike felt compelled to pose like this periodically throughout the evening. ;p The funny story behind his Christmas vest was it ended up to be my friends MOMS! I posted a picture of it on facebook when I spotted it in Goodwill & my friend said, "Oh my goodness, that's my moms old vest. She dropped it off at Goodwill a few weeks ago." Yikes! It was okay, though. Her mom gave us her blessing & said, "wear it with pride." As you can see...Mike is doing just that.
Now, let's talk more about this Hot Chocolate Bar from last week. I promised more detail & here it is...

First of all...let's talk about the decor. My only expense in the decor was...
* A roll of wrapping paper (few dollars) for the backdrop
* A huge book of scrapbook paper (50% off at Michaels so it was $10)
* An old frame from Goodwill ($1.21)
For the garland, I strung cotton balls with string & a needle. It was so easy & so cheap.
The frame, I primed & painted a bright red. I ended up using the "Heidi Handwriting" font for the different hot chocolate combo suggestions because our printer was being a little ornery.

The "platform" the frame is on is just an old box covered in the scrapbook paper.
The other plates/dishes I already had. And the peppermint cookie bouquets were just glass vases that I covered in scrapbook paper, stuck some floral foam in & then covered the top with mini marshmallows.
Onto the tasty items...

Gingerbread Biscotti...yum! Are you a fan of biscotti? I am....as in I could be head of the fan club. There is nothing that makes a cup of coffee better than biscotti.
Biscotti takes awhile to bake & you have to give it some attention...so as an attempt to make the process a tad quicker...I used Gingerbread Cake Mix.

You will also need a stick of margarine, 2 eggs, 1 cup of flour & 1/2 cup of chopped nuts (I used walnuts).
If you want the recipe...you can find it HERE. Just trade the "devils food cake" for the gingerbread cake mix.

Once you bake your dough, you'll cut slices of biscotti & then toast them on either side (the recipe will tell you how to do this).

Melt some white chocolate & dip the flat end to coat.
Once they're dry...they're ready to dip. These would make great Christmas gifts...stick em in a mug & tie a ribbon around it...bam! :p

Another thing I made were mini grilled cheese sandwiches with crescent rolls. These tasted great but there's two things I'd change...1) More cheese or add some other toppings 2) I'd cut them into triangles instead of rectangles. I just think they may look a little prettier in triangles.

They're really simple. Start with a can of the Pillsbury crescent rolls. Unroll the dough, cut into 8 squares/triangles. Place your cheese on one square/rectangle. I used white american cheese but it'd be fun to do a combo of cheeses or...oh...BRIE. Yes...that's what I should've done. Darn it. ;p Oh well...they may have not made it to the "photo shoot" above if I made them with brie. ;p
Back to the cheese...grilled cheese that is. Take the other square/triangle & place it on the one that has the cheese on it. Pinch the sides together. Bake according to the Pillsbury instructions & you're done. :-)
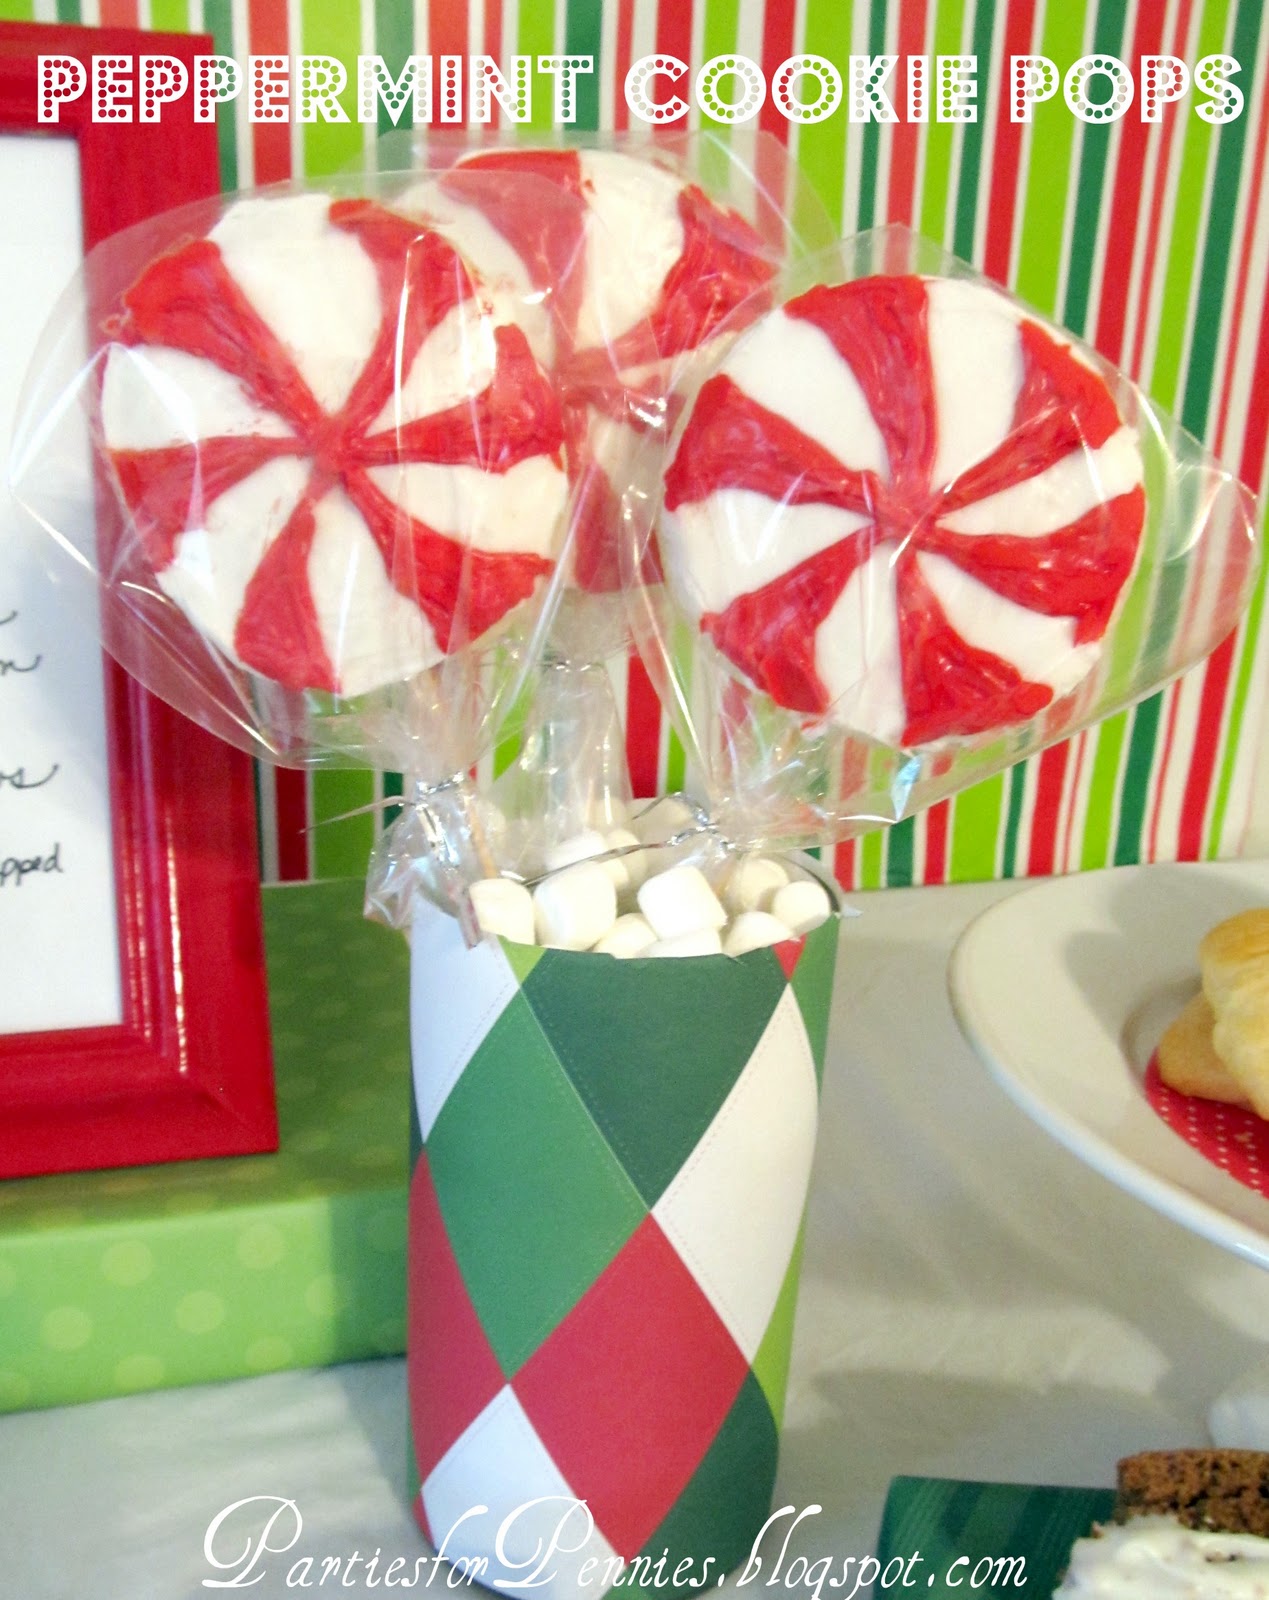
These peppermint "pops"...I'm not sure what to call them. Peppermint cookie pops? Peppermint Cookie on a stick? (If you're a Jeff Dunham fan, you'd appreciate that one) Peppermint Pinwheel? Anyways...they're basically sugar cookies decorated in colored icing to resemble a peppermint. Plain, simple & cheap...that's how I roll.

I just used pre-made sugar cookie dough. Look...during the holidays...it's busy enough & if you're doing the food for a party & hosting...I'm all about some shortcuts.
I inserted the lollipop stick in the cookie before I baked it. Then bake as directed.

Begin by icing the cookie with white icing. Using a Ziploc, or if you've got the "tools" use a decorating tip, cut a small (very small...at least start off this way, you can always cut more) hole at one tip of the bag.


Continue around the cookie until you have a peppermint design.
*There was ONE hitch I had. I used the pre-made jar of icing from the grocery store. The problem with that icing is that it doesn't really harden. I should've used the sugar cookie icing recipe my mom always would make. It hardens. This really only matters if you're putting the plastic over the cookies.

Another easy treat that goes well with hot chocolate is popcorn. This was super easy. I just made the cones from some of the scrapbook paper, popped the corn & it was done.

These are the toppings for the hot chocolate. For the rasberry syrup...I actually experimented using rasberry jelly & it worked pretty nicely. I added a few teaspoons of water to a pot & added a few teaspoons of rasberry jam. I brought it to a simmer & it made a pretty nice syrup.
Here are the combinations I suggested with the toppings above -


See those mug jackets? I made those from socks & gave them as favors. The mugs were from the dollar store...so everyone got to take home the mug & their mug jacket.
Here's how to make those -

My only regret is that, while the Christmas socks looked cute, they weren't really efficient. I'd buy either thicker socks next time or try it with a Goodwill sweater.

A great, inexpensive Christmas gift would be a mug, with the mug jacket on it & some Gingerbread biscotti tucked in. Wrap it in some cellophane, tie some ribbon around it & you've got a nice homemade gift for around $5 or so.
If you're still getting things together for a Christmas party or need some ideas, check out my "girls" Christmas party from last year. We had Southern food tapas, did a jewelry exchange (of jewelry we didn't want anymore) & spent just $50 on the whole thing! Read about it HERE & part 2 HERE.
(Sorry for the pictures...I think I took them all with my phone at that time.)
Next week...I'll give you guys some great stocking stuffers that are UNIQUE & under $5! I'll share the homemade gifts I'm giving my co-workers & some ideas for hostess gifts!
Hope you're having a not-so-stressful-Christmas season so far! :-)


Oh wow this looks so good! Awesome idea, and so affordable - I'll be doing this. For sure.
ReplyDeleteOnce again freaking genius!!! Love it!! Is it bad I actually think you guys look super cute in 80's Christmas flashback :)
ReplyDeleteHi Heidi-
ReplyDeleteThis is SO adorable. I will be adapting this for our food situtation!
I'm featuring you @ Creative Juice Thursday today!
Lovely blog you have hhere
ReplyDelete